How to: SSH SOCKS Proxy Server on a Cheap VPS
Access to a proxy server located on an outside network can be handy; folks in certain countries may need it to reach unfiltered content; others may want to reach local resources on a remote LAN; some may want to use Google Voice phone out services from overseas, or buy stuff online without geolocation issues.
Commercial VPN services, which could work for most of the above purposes, are both expensive and frequently inaccessible in certain countries (which will remain nameless). Those and other factors have lead me to explore a number of options for obtaining relative online autonomy.
Solution
I have had most consistent results accessing the great wilds of the open Internet via a SOCKS tunnel established through an SSH server. I have been using a physical server I set up in another country for this purpose for over a year now and recently started using a cheap hosted VPS provider as well (VPS = Virtual Private Server; think industrial-grade VMWare or VirtualBox setup).
This solution is cross-platform; it works natively from OS X, Linux, and other Unix-based guest systems, and is also accessible from Windows computers using PuTTY.
On any OS, Firefox is the web browser with the best SOCKS configuration options. For FTP, Filezilla also has SOCKS configuration options and runs on just about anything. Other applications can be configured to tunnel via SOCKS proxy but for most folks, a tunneled web browse will likely be sufficient.
Server Selection
I am renting resources from a small VPS operator that charges $16/year and includes allocation of far more system resources than are needed for running a simple SSH server (I could also host my websites on it if I were in the mood for that kinda thing). Check Low End Box for cheap VPS hosts (that’s where I found mine).
At $2 per month or less, renting space on a VPS server should be far less expensive than keeping a physical computer running all the time at a friend or relative’s house in another country. Possible exceptions may be some of the new low-voltage mini computers like the Wandaboard (I’d like to try one!). Regardless, your uncle Bob probably doesn’t live in a data center with a speedy fiber connection like what you should get with most any decent VPS.
Server Setup
The thought of administering a Linux server is enough to make most folks run for the exits. Any such fear is entirely unjustified in this case; what we are doing is dead simple.
When you buy your VPS subscription, you will have to select a ready-made OS to boot. Ubuntu and Debian images are the most common but just about anything should do.
Once you are paid up, your VPS host will send you an email with the the IP address of your server (e.g. 216.34.181.45), and root login credentials. To connect to your server, fire up a bash terminal (or PuTTY in Windows) and enter the following to connect, replacing the IP address with your own (here are (/connecting-ssh-server-via-putty)[Windows instructions for connecting via PuTTY]):
ssh root@216.34.181.45
Type yes to accept the certificate then enter the SSH password provided by your host when prompted.
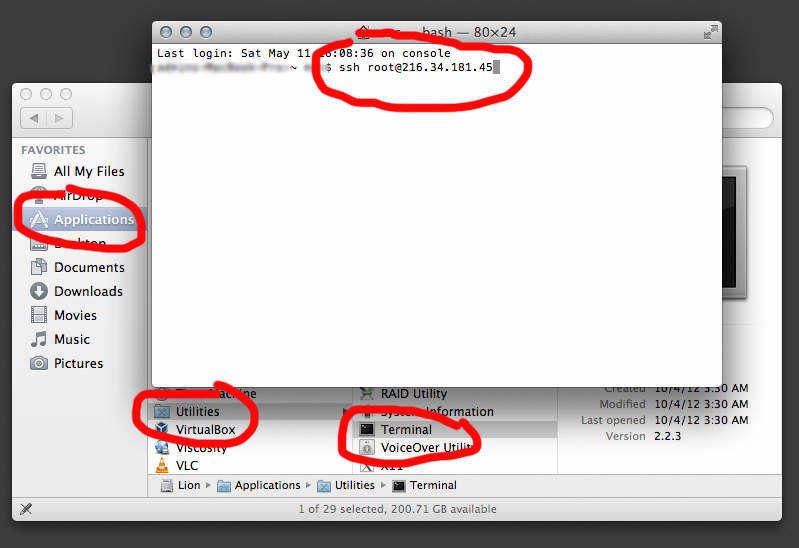
You should now be connected.
We need to edit a configuration file; enter the following to back up the original copy of that file (this is done on the server so works the same regardless of host OS):
cp /etc/ssh/sshd_config /etc/ssh/sshd_config.original
chmod a-w /etc/ssh/sshd_config.original
I like to use nano as my text editor, which you may need to install; enter the following on Debian or Ubuntu servers (you probably installed one of the other OS on your VPS):
apt-get install nano
…then press y to confirm if prompted.
We now need to edit sshd_config settings to allow port forwarding and therefore be friendly to SSH tunneling:
nano /etc/ssh/sshd_config
Find the below entries, un-comment them if they are commented (remove the # at the beginning of the line) and make sure they are set to yes. If they aren’t listed, add them (copy, paste…).
`AllowTcpForwarding yes
GatewayPorts yes`
Now enter hit ctrl-x to exit nano and follow the prompts (yes to save changes).
Enter one of the following to restart SSH and invoke the changes (the former for Ubuntu amongst others):
`service ssh restart
/etc/init.d/ssh restart`
You should now be able to tunnel through your SSH server, but keep in mind that it isn’t secure at all yet; skipping the Security section at the end of this page is stupid!
SOCKS Client Configuration
Now that your server is set up, connect to it to try things out (if you haven’t signed out of the session used for the steps above, do that now by typing exit or ctrl-d):
ssh -D 1080 root@216.34.181.45
You will need to replace the above IP with the one for your server…
If you are running Windows, read the [instructions for setting port forwarding in PuTTY](/putty-port-forward-settings-for-socks-5-proxy).
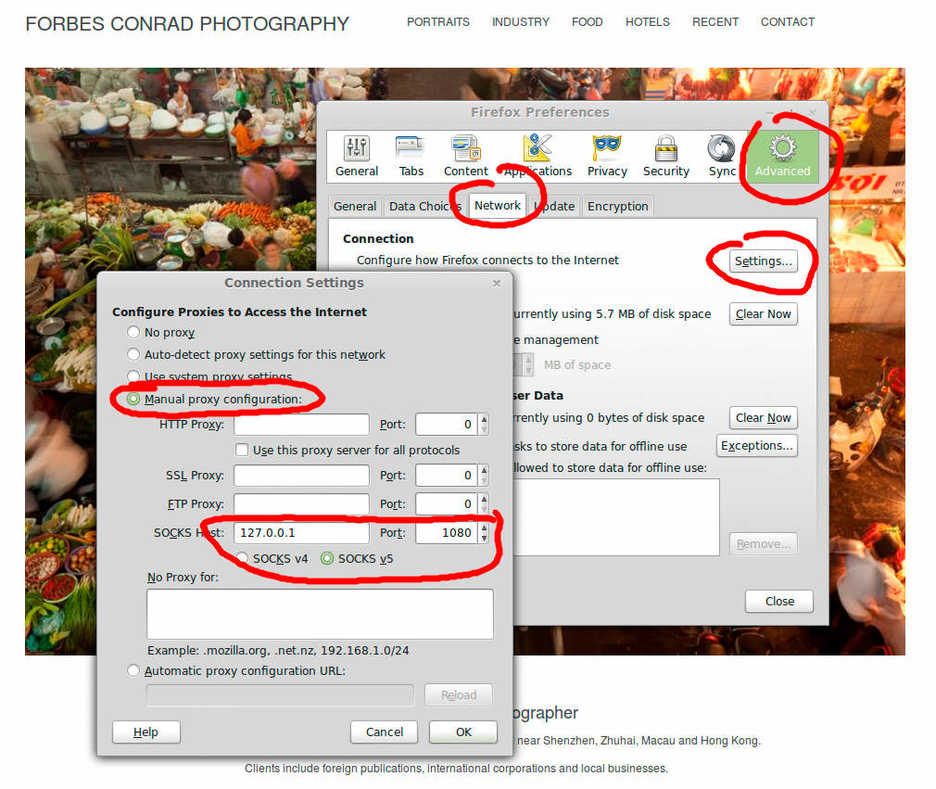
With that running, open Firefox and go to Preferences > Advanced > Network > Connection > Settings.
Toggle the selector to Manual proxy configuration and under SOCKS Host enter 127.0.0.1 on port 1080. In the No proxy for box, you may want to enter localhost if you need to access local network resources in Firefox as well as your proxy network connection (you could also put frequently used local website URLs in there if you use any that are best accessed without the proxy).
Once you have closed that window, you can check to see if your proxy is working by visiting someplace like Show IP.
You should also do the following in Firefox to make your browser DNS requests go through your remote server:
Type about:config in the address bar, accept the warning, then search for network.proxy.socks_remote_dns and double click to set the value to true.

SSH Server Security
I am not an expert on securing Linux servers but do know enough to say that you shouldn’t be connecting to yours as the root user or via password authentication. Here are a few things you should do immediately (if not sooner):
- Reset your root password. When logged into your new server, enter the following: `passwd root` Use a good password. I highly recommend generating long random passwords using a secure password manager like Keepass, KeepassX, or 1Password.
- Add a user with limited system privileges and only use that user when connecting to your server: `adduser username` This should also create a password and home directory for that user (you can't connect via SSH via a user lacking a password). Confirm that your new user works by disconnecting from the server and reconnecting with your new user; e.g. `ssh new-user@your-ip`
- Authenticate using SSH keys. The below instructions are for OS X or Linux guest computers; if you are working from Windows, see these PuTTY-specific instructions. Now that your new user is up and running, we need to allow it to log in with something better than a password. On your guest computer, enter the following to generate ssh keys (when logged in as your new user, not as root): `ssh-keygen -t rsa -b 4096` You can enter a password when prompted or not; if you don't enter a password, anyone will be able to connect to your server from your computer without first entering a password to unlock the key. This could be undesirable. Now transfer your public ssh key to your server. If you are working from Ubuntu, you can do the following: `ssh-copy-id your-new-username@your-ssh-server-ip` If you are working from OS X or a something else without `ssh-copy-id`, do the following: `cat ~/.ssh/id_rsa.pub | ssh your-new-username@your-ssh-server-ip 'mkdir .ssh; cat >> .ssh/authorized_keys'` Now try connecting to your new user on your SSH server: `ssh your-new-username@your-ssh-server-ip` You should now connect without being prompted for a password.
- Restrict SSH use. If you are still logged into your SSH session with your new SSH user, switch to root: `su root` Then open `sshd_config` to edit again: `nano /etc/ssh/sshd_config` Change the values below to those listed (un-comment the variables {remove the `#` at the beginning of each applicable line}, or add in the new variables if not present): `ChallengeResponseAuthentication no PasswordAuthentication no UsePAM no PermitRootLogin no AllowUsers your-new-user` Note: make sure you spell the username of your new SSH user correctly in the above entry; if you don't, you won't be able to connect to your server anymore and will have to start over from the beginning! When you are done editing, save the changes and restart SSH using whichever of the following work on your server OS (the former for Ubuntu): `service ssh restart /etc/init.d/ssh restart`
- Enable automatic security updates. Here's how to do it on Ubuntu: `apt-get install unattended-upgrades` The default options upon install will allow automatic installation of security updates; this is probably a good idea unless you will be monitoring this server closely.
- Change the SSH port to something other than 22. Hackers often scan for open SSH ports at 22 and 2222, so changing your listening SSH port to something different can add some security by obscurity, particularly if you are logging in using a password (which I don't recommend, see above). If you live in a country with active internet filtering, changing your SSH port may attract attention and therefore be undesirable; if that is the case, skip this step.
Open `sshd_config` to edit again when logged in as root:
`nano /etc/ssh/sshd_config`
Then edit the following entry and change the number to that of your port of choice – a random unused port number below 1024 may be best although random numbers between 49152 and 65535 could also be good (see this note and this for two somewhat contrary opinions):
`Port 22`
Close the file and restart SSH using whichever of the following work on your server OS:
`service ssh restart
/etc/init.d/ssh restart`
Now to connect, you need to change your command as follows:
`ssh -p your-new-ssh-port -D 1080 your-ssh0user@your-ip`
## Automation ##
With all the above accomplished, your SSH SOCKS server should be usable and relatively secure. To connect without opening the terminal and pasting/typeing in a command every time you want to start your connection, you can put your bash script into an executable shell script.
Make a new plain text file named something like `ssh-proxy.sh` Put the following inside the file (using your own server details in the ssh command):
`#!/bin/bash `
`ssh -D 1080 your-ssh0user@your-ip`
(add `-p your-new-ssh-port` if you are using a non-standard SSH port)
Save and close your file then make it executable by opening the terminal, navigating to the directory where you put your `ssh-proxy.sh` file (`cd ~/Desktop` for example) then do the following:
`chmod u+x ssh-proxy.sh`
Now you should be able to double click on `ssh-proxy.sh` and have it run in the terminal as needed (on OS X, change the name to `ssh-proxy.command`).
## Reference documents: ##
- http://blog.ashurex.com/2012/03/15/creating-ssh-proxy-tunnel-putty/
- http://www.chiark.greenend.org.uk/~sgtatham/putty/
- https://help.ubuntu.com/12.04/serverguide/automatic-updates.html
- https://help.ubuntu.com/community/SSH/OpenSSH/PortForwarding
- https://help.ubuntu.com/12.04/serverguide/openssh-server.html
- https://www.linuxquestions.org/questions/linux-networking-3/ssh-d-channel-6-open-failed-administratively-prohibited-open-failed-728219/
- https://help.ubuntu.com/community/SSH/OpenSSH/Keys
- https://www.cs.utah.edu/~bigler/code/sshkeys.html
- https://lani78.wordpress.com/2008/08/08/generate-a-ssh-key-and-disable-password-authentication-on-ubuntu-server/
- https://www.linode.com/wiki/index.php/SSH_Dynamic_Port_Forwarding